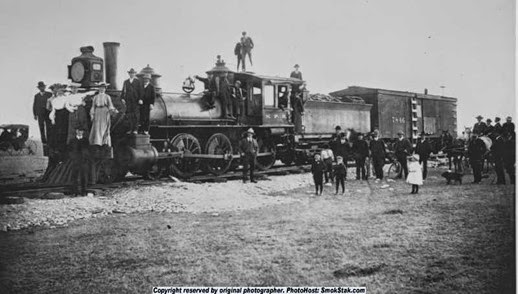
The first train into Lewistown, Montana on the old “Jawbone” Railroad in 1903. The Montana Railroad (Jawbone) was acquired by the Milwaukee Road in 1908 to help complete it’s transcontinental line.

Heath USG Gypsum Plant
After spending a lot of time working on the Denton area, it is now beginning work on the building in the Lewistown area of the layout. It has been several years since I built the Heath Gypsum plant from a Life Like Supply House kit. There was still many things I could do to improve the overall look of this building.
An overall view from late September 2014
(Left Photo) Since this is a major industry in the area the building needed a signage that reflected its importance. This sign is approximately 4’x8’ scale size and faces the crossing leading into the parking area behind the building.
(Right Photo) One of the car setouts for the plant is a chemical tank car unloading area at the farthest end of the structure. The chemical holding tank is from a DPM Inks kit that I had decided to cannibalize for use on other parts of the layout. The fence is from the Walthers chain link fence kit. The small pump shed is from Branchline Trains shed laser-art kit. When this photo was taken the pump hose had not yet been attached to the shed. You can see the hose in one of the photos below.
At the front of the structure is the receiving area for the incoming gypsum in covered hoppers. To create the unloading grate under the rails, to get started, I removed several ties from the track. Then used other ties to build a box for the grate to sit on. The ties were then painted a concrete color and the inside of the box was painted flat black to give the illusion of depth. After the paint had dried, I cut down a side grille for an F unit upgrade from Detail Associates to the proper length and glued to the top of the box. To move the gypsum from the unloading bin into the plant, I went to my scrap box and constructed a box from the bin to building. The cover for the box is an extra hatch from a covered hopper for servicing access.
(Left Photo) The last piece that was needed for the gypsum unloading area is the access stairs from the building to the unloading bin area. This was a simple construction of Plastruct shapes and diamond pattern sheet. The hand railing is bent wire glued to uprights. The stairs are from the extremely valuable scrap parts bin that everyone should keep on hand.
(Right Photo) To help keep the water supply constant for the plant, I used the Plastruct tank kit. The kit is pretty much built as is except for the hatch at the bottom left of the tank. To give it a more industrial look, I bought some small head sewing pins and drilled holes in the access cover. The pins were cut short and inserted in the hatch at regularly spaced intervals.
(Left Photo) The rear trackside door needed a platform or at least a stair case. I had considered a rail car loading platform, but decided that it would interfere with the chemical unloading area. So I decided on a simple platform that would be additional outside storage of barrels. A lone red barrel at the bottom of the platform will eventually be a mini-scene built around a hazmat crew. More to come on that later.
(Right Photo) The final enhancements to the gypsum plant was the addition of pallets and other junk to side of the main loading area. Every business has excess piles of unused items lying around waiting for a specific use or disposal.
Stock Car Weathering

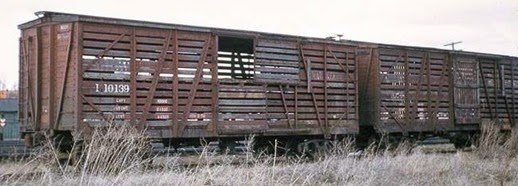
Photo from http://nickelwiki.pbworks.com/w/page/13276519/Modeling%20NKP%20Stock%20Cars
I have been working on building up the stock car fleet for the layout. There is not much offered in the way of prototypical versions of Milwaukee Road stock cars. The best versions available in kit form are the Westerfield Models 8200 series. These are perfect versions of the 36’ cars the Milwaukee used. In later years a newer 40’ version was constructed. I have one of these kits purchased from somewhere that is waiting for a time I can begin construction. That list never seems to get any shorter!
I have considered scratch building the cars from plans I found in the February 1983 Mainline Modeler article by Al Armitage. The time required to build a decent fleet of these cars would be exhausting. So the alternative is find what else maybe out there to help speed up the process. Walthers Mainline currently offers a nice version of a standard stock in Milwaukee lettering. One of these will be purchased to add to the collection. Even though it is not prototypical.
I was lucky enough to find someone who was selling a set of three Accurail Milwaukee Road stock cars including renumbering decals on the old Yahoo HO yard sale group. I also found a set of three undecorated kits at a train show. These cars are close to the Milwaukee version, but again are based on a standard design. The three Milwaukee decorated kits have been built and decaled with different numbers.
The next challenge is weathering these cars appropriately for the time I’m modeling (1969 -1970). My research shows that the Milwaukee had dropped stock car shipments dramatically between 1966 and 1971. No new cars had been constructed for quite a few years. The cars I do recall seeing in the Harlowton area were very aged and in need of repair. Most of the paint had faded and roof walks were broken and/or missing. With this in mind, I will be giving these cars a very aged, ready for retirement look. Below is an example of my first in the series. Looks like it is ready for the scrap yard, but still able to complete its assignment.
A scan of a Polaroid from my second layout in 1974. The Montana Central & Southern.
This was my first 4’x8’ HO layout. That would be 40 years ago. Wow, how time disappears!
Denton Homesteads
One area in Denton that hasn’t received much attention is between the tracks and the backdrop. In these small agricultural towns, residential homes were often found close to the railroad tracks. While the distance on my layout have been shortened for convenience.
We’ll start with an older photo of the area I am working on. As you can see at this time two structures have been placed. The bar on the left is a Woodland Scenics kit from a previous layout. All of these small towns had least one social center that survived the years. The other building is Tommy Knocker’s Cabin from Wild West Scale Model Builders.
Now let’s fast forward from June 2011 to the present. The photo below shows the amount of progress that has been made over several weeks. While it looks like a lot has been done. The progress of constructing building has happen slowly over several years. The recent additions have been in planting grass, hedges, flowering bushes, adding fences and other small details that pull the scene in one completed view. I say “completed” with caveat that no scene is ever really completed. There are always small additional details to be added and the opportunity to change ones mind once you have the chance to see it as a whole. The backdrop has now gone on this list to be updated with new colors that will more closely match the foreground.
Below are additional close-up photos of the individual buildings.
The Lewistown“Bulldog”
Engine No. 5900 and its twin, No. 5901, are unique among all the diesels operated by the Milwaukee Road. These two engines were the only completely railroad-built diesels to serve on the Milwaukee. Both engines were designed as combination engine-baggage cars. Approximately 85 feet long, the front 35 feet were used for the operators' cab, power equipment, and steam boilers; the rear portion of the engine was for baggage. No. 5900 and No. 5901 were rated at 1,000 horsepower and each was capable of pulling up to five passenger cars at a maximum speed of 75 mph. Both engines were retired in January 1961.
Photo from MILWAUKEE ROAD IN MONTANA Facebook page: Bill Abel
By mid-June 1948, 5901 was out of the shops, and for a while it pulled the Milwaukee – Berlin trains, 30 and 35. 5901 was soon transferred to trains 117 and 118 between Harlowtown and Great Falls, Montana remaining on that job until the trains were discontinued in August 1954. When the northern Montana passenger service ceased, 5901 returned to the Midwest for duty on trains 157 and 158 between La Crosse, WI. and Austin, MN.
“The Hottest Brand Going”… in Denton anyway!
For a long time I have had a blank spot along the front of the layout in Denton. I placed a concrete pad with the intention of building a gas station sometime in the future. Well, I guess the future finally arrived. I purchased a J.L. Innovative McLeod Super Service kit years ago with idea of using it in Denton. I guess the thing that has always held me back was the fact that is considered a “craftsman” kit. I was never sure if my skill level was up to the task. So with some trepidation I jumped into it hoping that I would not screw it up to bad. Well after several weeks of work the project is finally done. Some mistakes were made along the way, but nothing that couldn’t be covered up with paint, glue or weathering. There was one major booboo that I could not correct. The back wall of the garage that faces completely away from the viewer was installed upside down. Do’h! Thankfully it is in an area that would require the viewer to insert their head into the layout at an odd position to see it. So as long as I keep my mouth shut no one will know!
In the bottom right photo “Old Bill” had better watch what he does with that pipe or Clyde will finally need to buy a new car!
A view of the Belt Creek Trestle
This photo and some upcoming photo are from the John W. Barriger III National Railroad Library posted on Flickr. This collection contains thousands of photos from over 70 railroads from across the United States. It is an amazing collection! Visit the Barriger Collection @ http://www.flickr.com/photos/barrigerlibrary/sets/
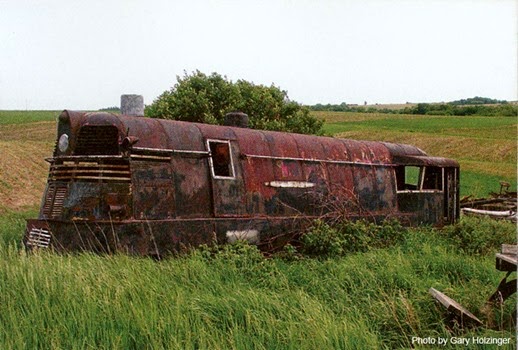
Could it be? A rusted old hulk of a streamlined Hiawatha steam engine left in some farmers field only to be recently discovered?
Unfortunately the answer is NO.
While searching the internet for images related to the Milwaukee Road, I came across this photo. I had the same thoughts as above. Why hasn’t someone started a preservation project for this? How could such an important engine in Milwaukee Road history be left in a field to rot? After some further investigation, I discovered the following information:
It was built in the Milwaukee Shops as a parade truck in 1941 for the American Legion Convention in Milwaukee
, using the styling of the class A Atlantics.It is still sad that it will probably never be resurrected, but a fascinating find just the same. To learn more about this piece of history you can click on the links below.
http://www.coffeedrome.com/hiawatha2.html
http://groups.yahoo.com/neo/groups/MILW/conversations/topics/28357
The stock yard at Geraldine update
I finished painting and blending the stock yard into the scenery at Geraldine.
The photo below on the left is from a previous post after completing the stock yard to give you a reference to how it looks now. The basic layer of painting is a dry brush of a gray-brown craft paint to give the wood an aged look. When more of the surrounding scenery is completed, I’ll add grass and other vegetation to complete the scene. An Atlas street light was also added to the scene for those early morning unloading by the truck ramp.
Next I’m back to the Denton area of the layout to complete another structure there. Until next time!
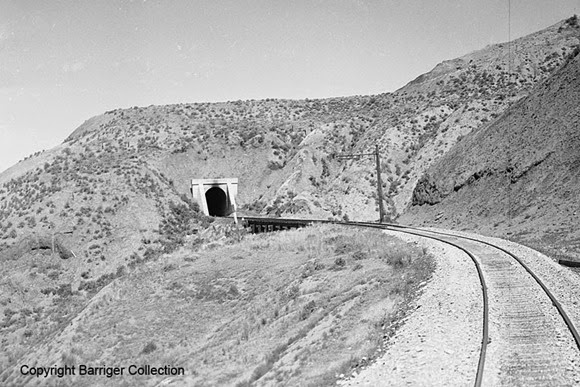
An unidentified tunnel on the line from Lewistown to Great Falls
This photo and some upcoming photo are from the John W. Barriger III National Railroad Library posted on Flickr. This collection contains thousands of photos from over 70 railroads from across the United States. It is an amazing collection! Visit the Barriger Collection @ http://www.flickr.com/photos/barrigerlibrary/sets/
Geraldine Depot Update #3
The depot is completed for now. I say for now because there is always something more to do. I like to study these photos and see where improvements can be made. Touch up paint here or there, additional weathering, fill a bad gap, you get the idea. It is interesting what you don’t see until after a photo is taken and studied.
On this project I did not have enough pre-made shingles for the roof. Rather than ordering or buying from the local hobby shop, I decided it was time to make my own. I have done this on other structures in the past, but found a great time saver in the pre-made variety. For this roof, I wanted to push it a little farther then I had done in the past. The shingles were given a random texture as to their size and condition. That meant cutting more angles for individual shingles and a wider gap in between. For the gap defining each shingle, I took a #11 blade and snapped the point off. This allowed for a wider separation between shingles. The it was simply a matter of doing some angle cuts from these gaps to give the shingles a more aged look. The color of the paper I used looks like your standard shopping bag or card board light brown.
The Milwaukee Road in this area I’m modeling had green shingles on their roofs. To get an approximation of that color required some trial and error. As an art student we were taught to create illustrations by using markers. This was before computers were common place and you had to learn illustration. I still have a large selection of these markers that were purchased during my college days. It is amazing that most of these work after 35 years! For the shingle color, I choose an olive style green and randomly went back over the sheet with several colors of gray to add variety to the overall appearance. Creating shingles this way took more time, but I really feel the end result is worth it.
Click on a photo to enlarge the view.