Tuesday, June 7, 2011

Layout Construction - May 2011

More Work on Denton
This month included more work in the Denton area of  the layout. Work completed included painting the ground with an earth colored paint, ballasting the tracks and adding roads with crossings.

IMG_0008IMG_0020

IMG_0001IMG_0013

IMG_0027IMG_0025

New Buildings and Weathering
The newest structure for Denton is “Design Preservation Models Shultz’s Garage” that I purchased at the train show in January.  I added a metal roof for variety. This structure will be an automotive/farm implement repair business. Additional details like old cars and junk will be added after the scenery is completed. The stock yards received a paint job to simulate weathered wood. I tested a technique using chalk to simulate rust on one of the silos. The same technique was used on the barn.

IMG_0003IMG_0005

IMG_0010IMG_0015

IMG_0012IMG_0023

Friday, May 6, 2011

Layout Construction–April 2011

Continued Work on Denton
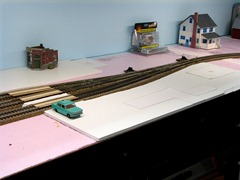
I have continued working on the scenery in the Denton area. This time I added a base board for the roads and some building in the area. The base board is 1/4” foam core. Using the foam core will bring the level of the road up to the same height as the track. In the first photo you can see an overall view east end of Denton showing a major road crossing and elevated areas for a gas station, repair shop and local watering hole. The second photo shows closer view of the crossing with inserts between tracks for the road surface. This road will be a paved two lane road.
IMG_0412IMG_0413

In this view, I have added a small country crossing to a local farm house. This will be a one lane dirt road. I also assembled a concrete silo to help hide the squared corner of the back drop.

IMG_0411IMG_0410

Operations Planning
Most of the month was spent working on a program to enhance the operating scheme of the layout. I came across a freeware program from the Model Railroad Hobbyist forum. The program is called “Easy Model Railroad Inventory”. You can check out Bob Langer’s website here. This program allows you to inventory all of your rolling stock, locomotives, buildings, library and much more. This is a very intensive program. As a benefit from inventorying your equipment, you can create waybills and car cards for operating sessions. Below are a couple of screen shots of the program’s inventory input sections.

updatefreightupdatelocomotive

Creating Car Cards and Waybills
One way to simulate real railroad operations is with car cards and waybills. Each car you own has a printed card with a photo of the car, car number, type of car and who owns the car. This card is folded to create a pocket to insert a waybill. Waybills describe what type of merchandise the car is carrying, where it came from, what its destination is and the type of car that is required. Below are examples of a card card for Milwaukee Road hopper #100285. The first photo shows a waybill for the car with no load (EMPTY). The car will travel from the staging yard in Harlowton to Montana Elevator in Geraldine. Once the car arrives at Montana Elevator and is loaded, the yellow waybill is moved to the back to reveal the next waybill. This waybill (which is actually the wrong one) shows the car destined for the Cargill grain export in Seattle, Washington.

IMG_0442IMG_0443

The main idea is that every train will have multiple car cards showing the destination for those cars. As the train reaches that car’s destination the car is set out at that industry and waits for the next train to come along to pick it up. This creates a realistic movement of cars across the layout. In the first photo below you can see how the cards are clipped to the front of the layout next to their destination. The second photo shows the box used to store car cards and waybills that are not currently on the layout.

IMG_0439IMG_0444

Tuesday, April 5, 2011

Layout Construction–March 2011

Helix Rebuild
If at first you don’t succeed, it maybe time to try again. The helix worked great for awhile. No problems. Trains ran smoothly after a lot of tweaking. With the change in seasons and humidity, the wood changed and trains did not run as smooth. After spending a lot of time looking for a solution, I decided the swing bridges would have to be redone. The most reliable solution was to change the swing bridges into drop bridges. I decided on using a pin system for reliable alignment. Wood dowels were inserted into the bridge and matching holes drilled in ledges in the layout. Shims were used to raise the bridge to the proper height. A benefit has been access into the room is now little easier. I again used an extension cord and receptacle to connect power to the helix.

IMG_0415IMG_0416

IMG_0419IMG_0421

IMG_0429IMG_0431

Continued Work at Denton
While looking at future scenery possibilities for Denton, I originally had the creek going straight back into backdrop.  I tried using a small mirror technique to give the perception of the creek continuing on beyond the background. The angle needed for the mirror to work, made it impossible to hide in the scenery.  For the second time, if don’t succeed, you need to try again. This time I changed the course of the creek bed to bend  out of sight to the right.

BEFORE

AFTER


031710 032IMG_0087

I also added the foam contours for the tunnel entrance and positioned the concrete portal and wing walls.

IMG_0084IMG_0090

Friday, March 11, 2011

Train Show – March 2011

The Hostlers Model Railroad Festival is the largest show of the season. This year was better than ever. There were more vendors and displays then in past shows. New vendors from outside of Utah included Colorado, Nebraska, Idaho and more. The manufacturer, Exact Rail from Provo, had a small display both to answer questions about their products. We spent all day at the show looking at everything and I attended one clinic. If there was only enough money to match the products I was sure that I needed.

hostlerfest2011

page47-1026-fullpage47-1027-full

page47-1040-fullpage47-1008-full

An short video about some interesting animation of a dump truck. Might be something I’ll use.

Here I am attending a clinic about the proper weight for rolling stock. Free and very informative.

page47-1035-full

I made out like a bandit with all the products available from vendors. Or, did they make out like a bandit from me? We were able to cross off several things off our “Scavenger List” and add things that were never there. The last photos of the painting truck and crew will make a nice story scene for the farm house.

IMG_0107IMG_0115

IMG_0110IMG_0112

IMG_0116IMG_0103

IMG_0105IMG_0099

AS5539_f_1DCF 1.0

Thursday, March 3, 2011

Layout Construction–February 2011

Denton Update
This month I spent time assembling grain bins for the elevator. A connecting platform will be built from the elevator across the tops of the bins. I also began to layout some the future building locations for the town.

022011 025022011 027

I assembled the farm house and barn for the not yet named farm. This farm will also include a hen house, garden and other small details.

022011 028022011 030

The grain bins did not include a base for the bins to sit on. The foundations need to simulate concrete. I cut circles from high density foam used for RC planes. Once the these are painted a concrete color, they should work great.

IMG_0091IMG_0095